


Help us #MakeItHappen!
If your child is able to sit still on the floor independently, try sitting them astride your leg, sat astride a roll or on a bench (depending on their size) so their feet are on the floor but their bodies are not resting on anything. As our children with DS love to have straight legs, make doubly sure their knees are bent and their feet are flat on the floor.
Once they are able to sit with you just holding at their hips, challenge them to reach out to the side for a toy or reach to the floor and back up. They will need to use their legs to balance themselves and prevent them from falling.
Next, try to raise the bench/ your leg so they have more weight on their legs but are maintaining some knee bend. Again, challenge their balance with reaching games.
Eventually practice this with the bench/ table/ your leg high so that they are just perching on the edge and much of their weight is through their legs but their knees are still a little bent.
You could do this on a small physio ball as well to challenge their balance further, moving the ball side to side to make each leg work hard.
 This is a fabulous position to work pelvic stability (as well as core and shoulder stability – see those sections for details)
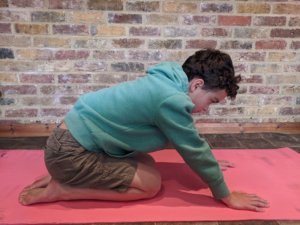
Start just trying to maintain a hands and knees position. It may be easier to start with your child sitting back on their heels and just balancing through their arms. If they want to shoot forward in this position, keep their bottoms down so they are sitting on their heels and hold them at their hips to help them maintain this position.
As they get stronger, move their bodies forward bit by bit and see if they can control their hips. If they start to shoot forward again, bring their bottom all the way back to their heels and start again. The aim is to get their shoulders over their hands and their hips over their knees. While they learn to hold this position, watching activities are the best – watching a tablet, reading a book etc so they don’t have to move their arms.
Once they are able to hold these positions, practice going from sat on heels position up to full hands and knees position and back again with control.
 This is a brilliant activity for the legs and pelvis but it is also fantastic for core and shoulder stability. It is especially good for children with DS who have low tone (floppy muscles) or who are very flexible as it builds stability in the hip and knee joints and can prevent children from building bad habits and hanging on their joints (e.g. locking out their knees in standing) to compensate for their weakness. It is therefore THE BEST activity that babies and young children with DS can do in their development.
Our children need to be able to hold their hands and knees position with confidence and be able to lift 1 arm before they try to crawl.
Once your child can lift 1 arm in hands and knees, move a toy just out of reach in front of them to encourage them to reach forward. Help them at their legs to bring 1 knee forward as they move the opposite hand forward so they don’t shoot forward at their hips.
Repeat this with the other hand/ foot until they start to move forward on their own.
It may be easiest to practice this with them sitting back on their heels again until they are more confident.
Once they can crawl forward confidently, put obstacles in their way for them to crawl around or over.
Use slopes or uneven surfaces (like grass) to challenge them further.
When they are crawling confidently, try crawling up the stairs. Let them reach up with their hands while you give them a little help with their legs.
If possible, allow them to become expert crawlers BEFORE trying to stand and walk. The more time they are crawling, the better for their bodies and physical development.
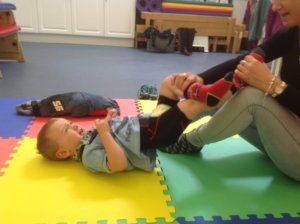
Bridging is good for strengthening their bottom and thighs.
Lie your child on their back with their knees bent and feet on the floor. Encourage them to lift their bottom up and down. When they lift it up try to make sure it goes as high as possible – to make a straight line from their thighs to their shoulders (but no further so they aren’t locking out their spine).
Once they can lift their bottom high, see if they can hold it for as long as possible. You can try to drive some cars or other toys under their bottom to help encourage them to hold it up.
They can also try to hold a ball between their knees while they do this to stop their knees floating outwards.
Progress to lying your child on their back with their knees bent and feet on the floor or on your lap and encouraging them to lift 1 leg in the air with that knee straight or crossed over the other leg. Now they should lift their bottom, keeping the other leg raised and their hips level, and then go back down again.
As they improve, ask them to try to keep their bottom up for as long as possible with their hips staying level.
Encourage your child to kneel up against furniture – a sofa can be a perfect height for this. Make sure they are in a straight line from their knees up to their shoulders and aren’t bowing forward or sticking their bottoms out. Also be sure that their hips are not swaying side to side.
Try correcting your child and then let go so they have to work on their own. Using your hands on them may mean that they lean into your support so try to ease your hands off whenever you can. If they are dropping back down or to the side, use 1 finger to poke their hips to remind them to come back up rather than using your full hand to help them back up.
To begin with the aim is for your child to stay up on their own. Use a book or tablet on the furniture so that, if they drop, they will no longer be able to see it as this will motivate them to stay up.
Next encourage them to lift a hand to play with a toy so that they are relying less on their arms to balance.
Move onto playing with both hands.
Next, try to keep their chest away from the piece of furniture so that when they play with their hands, they are using even more balance through their hips.

You can now try to encourage them to pick up objects from the floor or even turn to get a toy behind them to challenge them further.
Move their toy further down the sofa or furniture to encourage them to move sideways on their knees.
Once they are fully mobile against furniture, try high kneeling without holding on at all. They could even try to walk on their knees in all directions.
Play throw and catch in this position to further challenge their balance.
Set up an obstacle course so they are going over and around obstacles while on their knees.
When your child has mastered high kneeling, help them to bring 1 leg up in front of them so that they have 1 knee on the floor and the other foot out in front (and just to the side) of their bottom knee with both knees at 90 degree angles. Make sure their higher knee isn’t drifting in or outwards. Ask them to correct this or help them and then let go again so they can try to do this themselves.
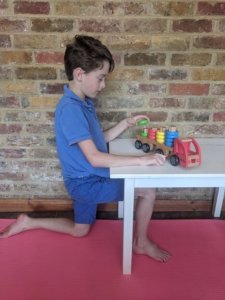
As with kneeling, start by your child holding on to furniture. A bench which fits over their front leg is ideal but they could do this at a table instead.
To begin with you want your child to just stay up there on their own. Use a book or tablet on the furniture so that, if they drop, they will no longer be able to see it to motivate them to stay up.
Next encourage them to lift a hand to play with a toy so that they are relying less on their arms to balance.
Move onto playing with both hands.
Next, try to keep their chest away from the piece of furniture so that when they play with their hands, they are using even more balance through their hips.
You can now try to encourage them to pick up objects from the floor or even turn to get a toy behind them to challenge them further.
If possible, we want our children to crawl before they start to stand too much as crawling is an amazing activity for the physical development of our children with DS. Once children are walking they rarely return to crawling so we only have a small window to be able to get all the benefits of crawling.
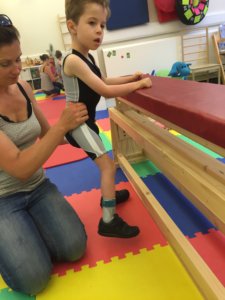
Practice standing at furniture. Your child should have their legs shoulder width apart and feet facing forwards.
Sit behind your child so you can comfortably hold onto their hips in this position. If possible they should be upright in their body with their bottom tucked in, although this may be something to work towards. If they drop you can guide them into siting on your lap. If they fall forward on to the furniture, see if they can come up by themselves before helping to re-position them.
If possible, try to release your hold bit by bit on them to see if they can maintain their hip stability and stay upright on their own.
Once your child can stand at furniture – try stepping 1 foot up onto a step to challenge them further. They could step up and down if they feel confident. Make sure the top leg is in front of the floor leg.
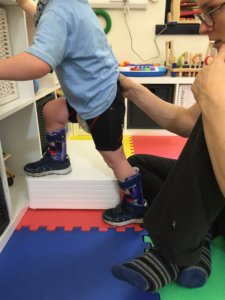
Next, ask them to reach to the side and down to pick up objects/ hit a drum/ post an object in a container etc.
This is a fantastic activity to strengthen the muscles on the outside of the leg and also to work whole leg stability and movement.
Once your child is able to lift their feet to step on a box or re-position their feet while standing at furniture, move their toy out of reach along the piece of furniture to encourage them to walk sideways. You may need to help them move their arms towards the toy. You can then help them by moving their body weight. Their weight should be OFF the side that they want to move.
So if they want to go left:
Move their weight over their right foot.
Lift their left hip to encourage them to bring their left foot out to the side.
Move their weight over to their left foot
Encourage them to bring their right foot in to meet the left.
And vice versa for the other side.
Once they are cruising happily along furniture, add obstacles in the way – steps to step on, cushions to stand on or toys to step over to challenge them further and ensure they are not locking out their joints again.
This is a great position to really challenge their balance skills between both legs and should only be attempted once they can stand without you holding on to them at furniture.
Stand your child with their back to a wall and their feet out in front of them with their knees slightly bent. Try and let go (if they are steady enough). Stay close and remind them to bend their knees a bit if they start to snap them back A watching game (TV or reading) is best here as using their hands can put them off balance.
Once they have their balance staying still, help them to step 1 foot onto a small step/ book and balance like this.
Next try to play a game to occupy their hands – playing on a tablet or target practice with balls and a bucket/ laundry basket.
Finally ask them to walk sideways along the wall to pick up an object and then walk back again to post it. Shopping games or other multi-piece games work well for this.
Start sat behind your child who is in standing with nothing in front of them. Make sure their feet are hip width apart and facing forward.
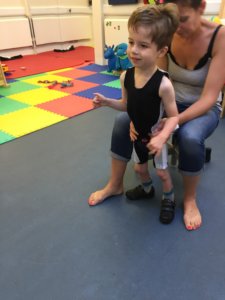
Hold them at their hips. Make your hands lighter and lighter as they start to balance for themselves. Try to let them correct themselves rather than doing it for them – you are there to stop them falling but they need to be able to make small balancing movements within the position.
Slowly move your hands down their leg as they get better at balancing. If at any point they feel stable, take your hands off and let them balance on their own.
If required, keep going down their legs with your hands until you are just supporting them at their feet. This may be particularly useful for your child if they wear splints.
Let go with one of your hands and then swap hands until you can let go with both hands and your child can support themselves.
Go through this sequence slowly – especially if your child is nervous – they should be improving their balance before you move on to the next stage.
Once they can stand with their legs hip width apart and you holding their hips, try very gently to move them side to side over 1 leg and then the other and see how they balance. If you have someone else with you, they could ask your child to reach side to side for objects to help them bring their weight over to each side. If not you can just help them move sideways with your hands on their hips.
Make sure they aren’t snapping back their knees here. Movement often makes it easier to have soft knees so if they are snapping back their knees, get them moving over their 2 feet to help them release their knees.
From here, help them into a step standing position – with 1 of their legs forward so they are in a stepping position. Again just hold their hips with their weight evenly distributed between the 2 legs.
If they manage to balance here and you can loosen your hands a bit, try moving them forward over the front foot and back again to their back foot. Again, use reaching games to help them move.
Hold them at their hips. Make your hands lighter and lighter as they start to balance for themselves. Try to let them correct themselves rather than doing it for them – you are there to stop them falling but they need to be able to make small movements within the position. Swap which is their front leg throughout the progressions.
Slowly move your hands down their leg as they get better at balancing. If at any point they feel stable, take your hands off and let them balance.
If required, keep going down their legs with your hands until you are just supporting them at their feet.
Let go of one of your hands and then swap hands until you can let go of both hands.
Now try doing the same but with 1 foot on a low step/ hardback book. The foot on the book needs to be in front of the floor foot. This position is very important as it helps to increase the stability in the knee and prevent your child just locking out their joints to stabilise themselves.
Walking aids are not often necessary but if you and your physiotherapist decide it is the best option, try to ensure your child is still taking lots of weight and balance through their legs rather than supporting them fully in the aid. Discuss this with your physiotherapist.
Forward Walker – If your child has standing balance when at furniture, they may manage to take steps using a forward walker or just use a child’s pushchair. They won’t be able to put their weight through their hands so will take good weight in their legs which will challenge their legs nicely.
Quad sticks – If your child is managing very well with their forward walker, they may be ready to progress to 2 Quad sticks or Tripod sticks. Make sure that the opposite leg goes forward at the same time as the opposite hand (i.e. right leg with left hand) as this mimics and prepares for walking without a walking aid.
Lastly they may try just 1 stick. If your child has 1 side that is better than the other, the stick should go in the opposite hand and go forward at the same time as the less good leg.
Often, independent standing balance (for around 5-10 seconds) coincides with independent walking.
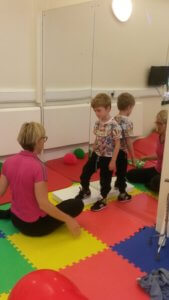
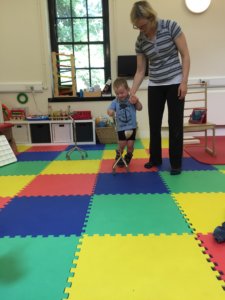
To lead up to this, practice walking holding your child’s hand.
As your child becomes more stable and confident through practice, reduce the support for your child.
If you are walking holding 2 hands, change grip so that you are holding your child but they can’t hold you (i.e. hold them round their wrist)
Then move your hands up their arm as they improve until you are able to just hold them at the top of their shoulders.
At this point they should be able to manage a step or 2 on their own and can keep practising until they walk independently.
While practicing walking holding hands, you can also practice walking between 2 pieces of furniture:
Set up 2 bits of furniture parallel but close together so your child can move between them both holding on to both.
Slowly move the furniture away from each other so your child is having to stretch to hold with both arms and, eventually, needs to take an independent step without holding on.
At this point your child is likely to be puling themselves into standing so if you are able to leave the furniture set up like this they may well practice in their own time and surprise you with the results!